Featured Post

Kerala's First 3D Printed Building

Created as a showcase project, AMAZE-28, the single-room summer house, was successfully constructed within 28 days on the grounds of the Kerala State Nirmithi Kendra. The 3D-printed building at the Kerala State Nirmithi Kendra in Thiruvananthapuram. (Photo: Shekunj)  The inauguration of Kerala's inaugural 3D-printed structure, a 380-square-foot single-room summer house, is scheduled to take place on October 10 at the Kerala State Nirmithi Kendra (Kesnik) campus located in PTP Nagar, Thiruvananthapuram.  Conceived as a showcase initiative, the summer house named AMAZE-28 was successfully finished within a mere 28 days. This impressive project was executed by Tvasta, a construction technology startup based in Chennai, founded by alumni of IIT-Madras, who have entered into a memorandum of understanding (MoU) with Kesnik.  AMAZE-28 is perched upon a concrete foundation atop a gentle elevation within the Kesnik campus. Febi Varghese, the Director and Chief Executive Officer of Kesnik, p

How to select power supply for the project 2022

 Power Supply Selection for Project: Powering up your projects (Robotics, IoT, Mechatronics, Automation, etc.) means providing its parts (micro-controller, sensors, actuators, etc.) with right supply. These parts require different supplies of different current capabilities. In this article you will know about different powering method and their characteristics.


 How to select power supply for the project?

What is a supply?

When you build any project like robots, mechatronics, automation, IoT projects you will need to consider how you will supply it with power. In fact, some parts, such as micro-controllers and sensors, typically require either 5 or 3.3V. They also need a stable (regulated) voltage supply. Other parts may need 12V such as motors. This require several different supplies with different current capabilities. In this post, different ways of supplying power to your project are presented and discussed.

Battery

Your main power source is always a DC battery. Batteries come in different types, sizes and power ratings, but one thing that is common is that they are unregulated power sources. Their output voltage decreases with time, which makes your robot move slower or your Arduino to reset. It is never recommended to use a battery without regulation.


Voltage regulation

Regulation provides a steady output voltage even when the voltage of the battery drops down (line regulation) or the power consumption varies (load regulation). This is essential for the parts that should be supplied with a fixed voltage, such as ICs or sensors.

A regulator is an electronic circuit that is added between the battery and the other components to ensure that they are supplied with a steady voltage. Regulation can be done using linear or switching regulators.

Linear regulators

Linear regulation uses linear regulator ICs of 3 pins: one for the unregulated input voltage, one for the regulated output voltage and one for ground.

NOTES

  • Linear regulators can either be fixed, such as the 78XX series or variable such the LM317
  • They can handle currents up to 1.5A. • Linear regulators have high voltage drop (around 1.5V). Recent regulators, such as the AMS1117, have low voltage drop (<1V). They also have low efficiency (<65%). So, unless efficiency is not an issue, you can use these regulators in your robot.
 

Switching regulators

Switching regulators are also voltage regulators. They are more recent than linear regulators and have much more advantages over them:

  • Switching regulators are characterized by their high efficiency (>95%) 
  • They can handle higher currents than linear regulators.
  • Switching regulators can decrease the input voltage (step-down or buck) or increase it (step-up or boost).

Buck converter

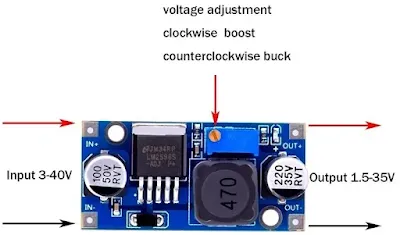
Buck converters take a higher input voltage and outputs steady voltage of lower level, just like linear regulators. They are small, cheap, efficient and most importantly, can be regulated to any output voltage level. LM2596 is an example of buck converters boards.


Boost converter

If the battery voltage is lower than the desired voltage or when you cannot use a battery of high voltage for any reason, you can use a boost switching converter to step-up your battery voltage into a higher steady voltage. LM2587 is a popular boost converter board.


Final Notes

Powering up your robot is essential for its proper functioning. It is also the main reason for damaging its components if it was not properly done.

Note that some components come with built-in regulators, like Arduino boards, but many other components don't. So they rely on the user to provide them with the right steady voltage level.

There are many ways to power up your robot, these techniques can be divided into unregulated ways (from a battery) or regulated (using a linear or a switching converters).

Comments

Popular posts from this blog

Controlling LEDs over WiFi using NodeMCU and Blynk App.

This article is the base on the Internet of things ( IoT ) . IoT describes the network of physical objects—“things” or objects—that are embedded with sensors, software, and other technologies for the purpose of connecting and exchanging data with other devices and systems over the Internet. In this article 3 LEDs will be controlled by an android application (made using Blynk) over a wifi connection. How to use NodeMCU with Blynk  If you want to start learn the Internet of Things (IoT) concept, then controlling a LED over the  internet is the " Hello World!" of the IoT journey. Performing the " Hello World" task will be easy using NodeMCU micro-controller as the first client and Blynk as the 'broker' or server and Blynk android application as the second client. Now communication between two clients will happen through broker over the internet. Now lets, make this happen.  Components Required For this activity we will need following components: Nod

Kerala's First 3D Printed Building

Created as a showcase project, AMAZE-28, the single-room summer house, was successfully constructed within 28 days on the grounds of the Kerala State Nirmithi Kendra. The 3D-printed building at the Kerala State Nirmithi Kendra in Thiruvananthapuram. (Photo: Shekunj)  The inauguration of Kerala's inaugural 3D-printed structure, a 380-square-foot single-room summer house, is scheduled to take place on October 10 at the Kerala State Nirmithi Kendra (Kesnik) campus located in PTP Nagar, Thiruvananthapuram.  Conceived as a showcase initiative, the summer house named AMAZE-28 was successfully finished within a mere 28 days. This impressive project was executed by Tvasta, a construction technology startup based in Chennai, founded by alumni of IIT-Madras, who have entered into a memorandum of understanding (MoU) with Kesnik.  AMAZE-28 is perched upon a concrete foundation atop a gentle elevation within the Kesnik campus. Febi Varghese, the Director and Chief Executive Officer of Kesnik, p

How to Know the NodeMCU IP Address for Your Next IoT Project

  NodeMCU IP Address: The NodeMCU is a popular development board for IoT projects. It’s small, affordable, and comes with built-in Wi-Fi connectivity, making it the perfect choice for creating connected devices. But before you can start building your NodeMCU projects, you need to know the IP address of your device. This IP address is essential for communicating with the NodeMCU from another device, such as a computer or smartphone. In this article, we’ll show you how to find the NodeMCU IP address, so you can get started with your next IoT project. Method 1: To Know the NodeMCU IP Address One of the easiest ways to find the NodeMCU IP address is by using the serial monitor in the Arduino IDE. First, connect your NodeMCU board to your computer using a micro-USB cable. Then, upload the following code to the NodeMCU: #include <ESP8266WiFi.h> void setup() { Serial.begin(115200); Serial.println(); Serial.print("Connecting to "); Serial.println("